Aerial Survey Guide for Vision Aerial Drones
How to Perform an Aerial Survey for Drone Photogrammetry
Conducting an aerial survey for photogrammetry is one of the most common drone applications. This guide will provide an overview of the process for beginning drone pilots. It will also provide specific recommendations, tips, tricks, and best practices so that you can produce professional-quality deliverables.
What is Photogrammetry?
The American Society for Photogrammetry and Remote Sensing (ASPRS) defines photogrammetry as, “the science or art of obtaining reliable measurements by means of photography.”
In the image below, the photos were stitched together and used to create a 3D model. Then the area of the parking lot could be calculated in Drone Deploy software.

How Photogrammetry Works
A drone performing an aerial photogrammetric survey takes a series of overlapping images with a high-resolution camera. A logging device collects geographic coordinates for each photo. Then the images and geodata are uploaded to post-processing software that stitches them together to create a map or model.
Photogrammetry is the process that combines photographs with surveys and maps. You can extract measurements and other information from the resulting data products. The final outputs can include different kinds of 2D orthomosaic maps and 3D models.
Planning for an Aerial Survey
Data collected during the drone survey will be transformed into real-world measurements and distances. Therefore, it is important to understand the client’s desired outcome, final deliverables, and resolution prior to creating a flight plan. These factors will determine the flight parameters for the mission.
One of the most important metrics to take into consideration when flight planning is Ground Sample Distance (GSD). The GSD will help translate the distances in the images to distances on the ground. Variables such as flight altitude, camera focal length, and sensor width will affect the ground sample distance. Check out this article to learn more: What is Ground Sample Distance (GSD)?
To determine what GSD to target, ask the customer if they have specific accuracy and precision requirements. If the client does not have specific requirements, ask them what they intend to look for in the photos. This information can help you determine how high or low of a ground sample distance to aim for.
On-Site Surveys
An important component in planning a survey is conducting a physical, on-site walkthrough. This will help you get a better understanding of the environment. Many pilots use Google Earth or similar tools to check out the location, however, they can sometimes be out of date. Therefore, it is advisable to travel to the site and see it in person.
During the onsite survey:
Scope out ideal takeoff locations.
Make note of obstacles to avoid such as trees, antennas, power lines, buildings, or other features.
Identify several safe areas to land the aircraft in the event of an emergency.
Mission Planning with Flight Planning Software
Many pilots use mission planning software like Vision Aerial Flight Deck to plan flights for aerial surveys. Parameters including altitude, image overlap, and flight path are set ahead of time on a map overlay. Once you enter the camera and the other variables into the mission plan, the software calculates your flight speed and ground sample distance. If you want to increase or decrease the ground sample distance, adjust the other variables until you get the resolution you need.
Air Space
When planning your aerial survey, always be aware of airspace restrictions and Temporary Flight Restrictions (TFR’s), weather conditions, obstacles, terrain changes, and population density. These are all factors that could have an impact on the safety and success of a mission.
There are several resources online with this information:
Aloft Integrated Fleet and Airspace Management
B4UFLY Drone Airspace Safety app from the FAA
Takeoff Location
Another thing you will need to do when planning a mission is to set the takeoff location and determine a “cockpit area.” This is the takeoff/landing location where the Remote Pilot in Command (RPIC) will be for the majority of the operations.
Best Practices:
Plan takeoff/landing locations in a wide-open area on flat ground.
Ideally, the takeoff/landing location will be in a position where the sun won’t interfere with maintaining visual.
Try to make sure the cockpit area provides a sufficient line of sight over the entire Area of Interest (AOI).
Altitude
Flight altitude is one of the leading factors that will affect image resolution and GSD.
Flying higher will improve the processing software’s ability to stitch images together because it allows the drone’s camera to cover more area in a single image. This allows the drone to take multiple images of the same features with overlap.
Photos taken at a lower altitude will prove a higher quality GSD but require a higher overlap rate. This increases flight time. If there is not enough overlap between images, it can be difficult for the post-processing software to stitch the pictures together.
The altitude you select will also relate to the camera lens and the resolution requirements.
Best Practice: For many surveys, 150-300 feet above ground level is a good starting point. You’ll be able to avoid most obstacles at this height and it is still low enough to provide a decent ground sample distance.
Flight Speed
The flight altitude and the rate of forward overlap determine the flight speed. The mission planning software determines the optimum flight speed.
Too slow of a speed can be inefficient.
Too fast of a speed can create image blur and miss photos.
The speed of the drone cannot outpace the camera’s ability to trigger and write the image file.
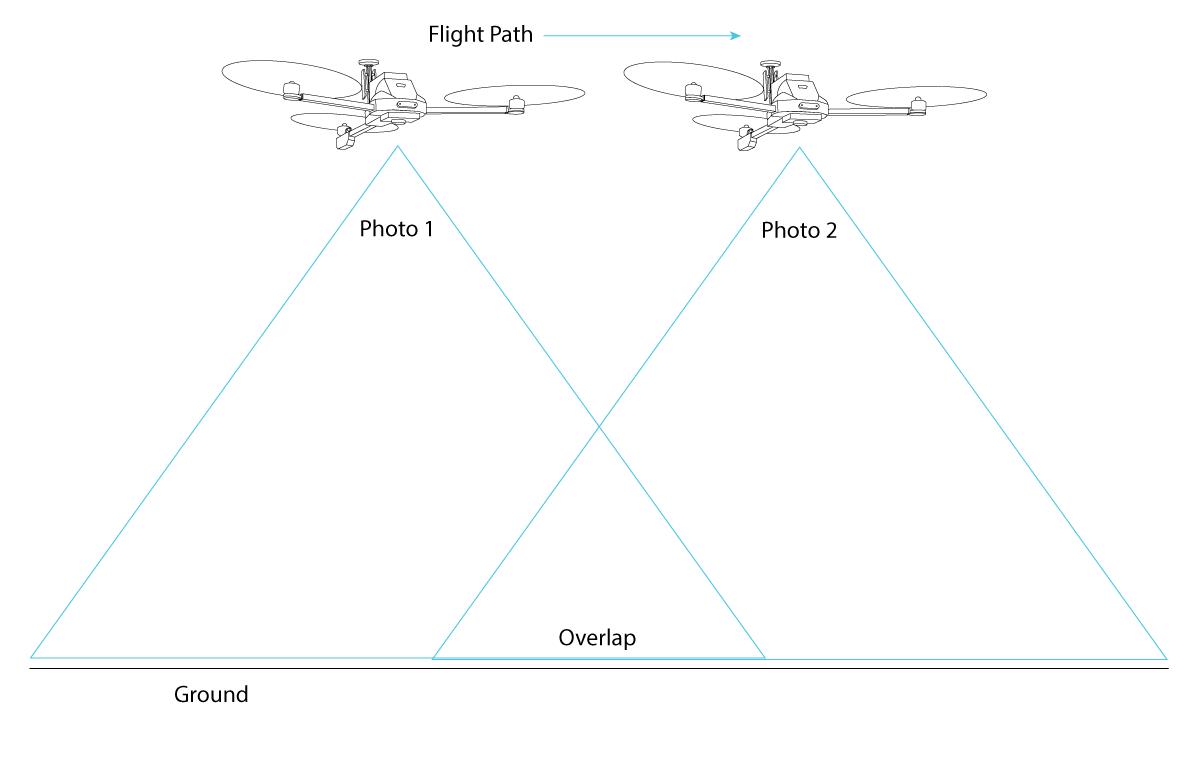
Image Overlap
This setting determines how much overlap there is between images. More overlap allows more opportunities for separate photos to match up and successfully stitch together in post-processing.
Best Practice: Set the front/side overlap of at least 70/70.
Diagram of a drone taking overlapping images during an aerial survey
Camera Mounting
To produce a 2D map, nadir mount the camera sensor so it is pointing straight down at the ground.
To produce a 3D model, you may need to perform additional flights with varied camera angles.
Best Practice:
To produce 3D models, perform three separate double grid missions at different altitudes and with varying camera angles. Perform the highest flight with a 90-degree angle, a lower flight at 75, and the lowest at 60 degrees.
Performing orbital flights around the object at different altitudes can also achieve similar results. However, this can add additional risk depending on the environment. Be aware of potential hazards prior to flight.
It’s important to make sure that the horizon is not visible in the images because it can create problems in post-processing.
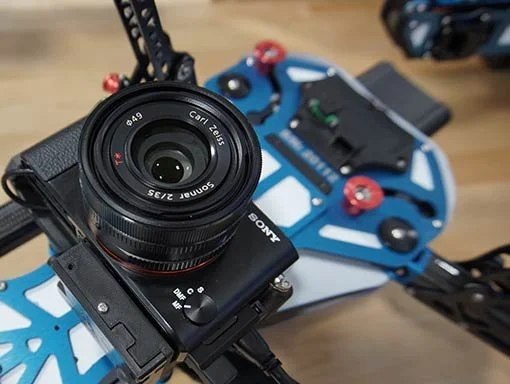
Nadir mounted Sony RX1R ii camera on a SwitchBlade-Elite drone.
Camera Settings for an Aerial Survey
There are many variables that go into creating a clear, sharp, and well-exposed image. Environmental conditions, ISO, shutter speed, aperture, and white balance all work together to create the highest quality photo. One element will impact another, so you may need to do several test runs to determine how to get the best quality outputs.
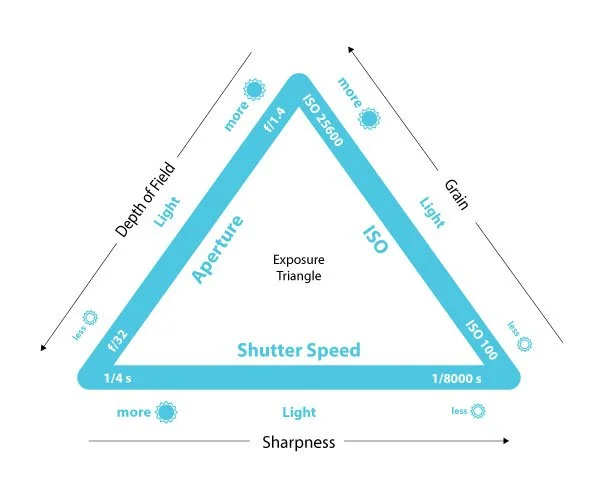
Best Practice: Camera aperture, ISO, and shutter speed are settings that impact the amount of light entering the camera. Each variable has a different effect on image quality. Adjusting one setting may require adjustments to another to ensure an image is exposed properly.
Environmental Factors
The amount, consistency, and intensity of environmental light will be the biggest factors to consider when adjusting camera settings.
Scattered clouds can significantly impact the quality of produced maps and models.
Flying on an overcast day allows the clouds to act as a light diffuser and helps create consistent image brightness and minimal harsh shadows.
Sunrise and sunset can distort the color of the images and create more shadows.
ISO
ISO is the camera sensor’s sensitivity to light. A lower ISO value means less sensitivity to light, while a higher ISO is more sensitive.
400 ISO and below will provide the crispest images.
A higher ISO can introduce image grain/noise.
Best Practice: Set the ISO as low as possible for images with less grain.
Aperture
The aperture is the opening of the lens’s diaphragm. Changing the aperture will affect how much light comes in through the camera lens. The aperture size can affect the image depth of field. Normally a photographer adjusts the aperture to help focus on a subject. However, this is not as much of a factor in photogrammetry. Aperture can also help adjust for exposure in combination with the shutter speed and ISO settings.
The lower the aperture number the wider the shutter will be, allowing more light and a brighter image. However, the background may become blurred when using a low aperture.
The higher the aperture number the narrower the shutter will be, allowing less light and a darker image. Using a smaller aperture will ensure items far away remain crisp.
A general range for aperture falls between f7.1 and f11, however, it may need to be higher or lower based on the other settings and environmental conditions.
If the cloud conditions aren't completely consistent, it can be difficult to manually select a correct aperture.
Best Practice: Set the camera to shutter priority. This allows for faster image capture (reducing blur). Then the camera will automatically adjust the aperture for the best exposure.
In the photo below, the pilot set the camera to manual mode (M). This allowed more control over the settings (ISO, aperture, and shutter speed), due to light conditions that day.
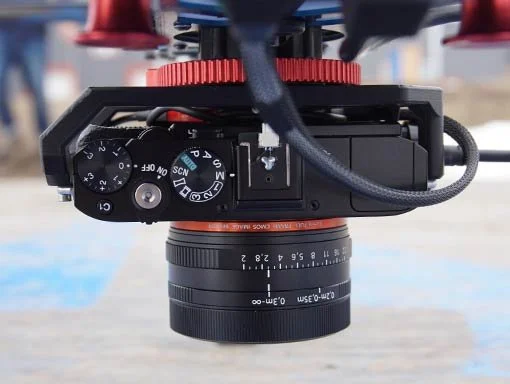
After several test runs, we changed the camera settings to manual and set the aperture to 3.0 to compensate for cloudy, low light conditions.
Shutter Speed
Shutter speed controls how long the camera allows light to enter the sensor.
A faster shutter speed allows less light to enter the sensor
Faster shutter speeds can help prevent motion blur in the images
Slower shutter speeds allow more light to enter the sensor and can help brighten an image
Best practice: Shutter speeds between 1/240 and 1/1,200 should provide images without motion blur, depending on conditions. Be sure to take a test picture with your settings prior to starting a mission to ensure optimal image quality.
White Balance
White balance affects the temperature of an image – how much yellow or blue cast is present. Set the white balance so the image appears most neutral in color temperature and has a good amount of contrast.
Best practice: Keep the white balance fixed to minimize variation between images.
Camera Focus Settings
The focus settings you use may depend on the camera model. Sometimes manual focus may work better than autofocus. Some cameras will not allow you to set the focus to infinity while in autofocus mode.
Best practice: If you are using the Sony RX1Rii or the Sony a6400, set the camera’s focus to manual and focus to infinity. In our tests, setting the focus to infinity for these cameras resulted in good image quality because it focused on the object furthest away.
Performing the Aerial Survey
Scope the Area Of Interest (AOI)
If you are not able to scope out the area of interest prior to flight planning, it is critical to evaluate the area before flying for ideal takeoff locations, obstacles that could be a safety factor terrain changes, and emergency landing areas.
Check for the following hazards:
Air: trees, antennas, power lines, buildings, etc.
Ground: slip/trip/fall hazards, wildlife, poisonous/spiky plants, etc.
Ground Control Points and Survey
If there is an accuracy requirement for the data, it is important to use Ground Control Points (GCP’s) and take topographic check shots. GCPs anchor the map or model to its actual position on the Earth. GCP’s and topographic check shots are also great ways to prove the accuracy of a map or model.
Learn more about using Ground Control Points.
Checklists
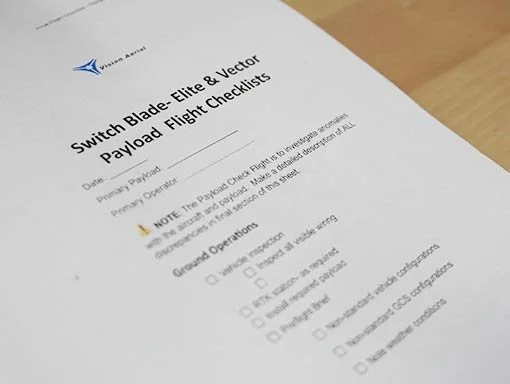
Pre-flight checklist for an aerial survey using a SwitchBlade-Elite or Vector.
Vision Aerial has several checklist templates available. You may wish to develop your own checklists to ensure no critical task is missed during a mission.
In aviation, preflight checklists exist to ensure the pilot and flight crew perform the tasks necessary to ensure the safety of the operation. Checklists are critical to the safety and success of any flight operation – manned or unmanned. Vision Aerial provides some basic checklists (link) and recommends that you develop additional ones to suit your needs.
Pre-flight: A pre-flight checklist should include every piece of equipment needed to successfully complete a mission. Download an example.
In-Field: An in-field checklist should include aircraft pre/post-flight checklists at a minimum. Perform preflight checklists prior to every flight.
Project progress, QC processes, and data management can all each have an individual checklist to ensure no important tasks are missed during the mission.
Mission Execution
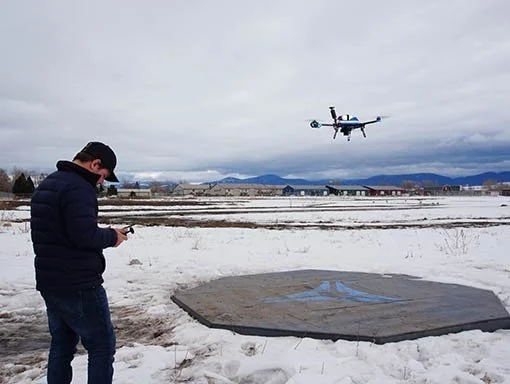
Prior to takeoff, the preflight checklist was reviewed. A visual observer pointed out several geese and powerlines nearby
The Part 107 drone license study materials cover legal requirements and best practices for executing a drone mission. Some key points are repeated here:
Crew Resource Management (CRM) is critical to the safety and success of any flight operation, whether it is manned or unmanned. Every member of the crew should have a shared mental model of what the project schedule will look like, the flight parameters of the missions, and designated roles for any emergency procedures that may need to be performed.
Always maintain Visual Line of Sight (VLOS) with the aircraft.
Always check airspace restrictions, TFR’s, weather conditions, obstacles and hazards, and non-participants within the AOI before flying.
Utilize Visual Observers (VO’s) for larger mapping missions when able/necessary.
Make sure to follow Standard Operating Procedures (SOP’s) for the aircraft and sensor.
Quality Control (QC) Process
It is always important to quality check (QC) your data. That way, if there are any errors or missing images, you know before leaving the job site.
Ideally, a QC process will be performed after every flight. This ensures the data collected is sufficient and a re-flight is not required. If more than one takeoff location is needed, it is recommended to QC before packing up and heading to the next takeoff area.
Aerial Survey QC Process Overview
The first step to QC photogrammetry data is to manually look through the photos and verify that the exposure is not too bright, too dark, or has image blur.
To quality check the coverage area, create a .CSV file of all the image locations and upload the .CSV into Google Earth Pro (Vision Aerial offers software to geotag images outside of post processing software). This will show you the location where each picture was taken, as well as a visual representation of the spacing between images. You can also use this to check that the entire AOI was covered.
You can also use Pix4D or DroneDeploy processing software to quality check images. For this method, you do not need to convert your images to .CSV as long as they are already geotagged.
Select all the photos for the project, and upload them to the Pix4D desktop app or DroneDeploy web app.
Review the location of each image capture, the spacing between images, and check that the entire AOI was covered.
Data Management
To ensure post-processing goes smoothly, in-field data management is crucial. A best practice is to separate each flight's images into separate folders. If any errors or missing data are found during QC, this makes it easier to find and fix the problem.
Commonly Used Software
Image Editing Software
You may need to adjust images prior to importing them into photogrammetry software. For example, if scattered clouds affect image lighting, you can use software to brighten images as needed for consistent tone across your entire map. Adobe Photoshop and Lightroom are two well-known in the industry for adjusting images.
Photogrammetry Software
This software stitches images together and links them to additional data. Many software options can be used to calculate measurements or determine angles between objects in the photos. They also include tools that allow users to create different outputs such as orthomosaics, 3D surface models, DSM, DEM, point clouds, textured models, and more. Common tools and features include volumetric analysis, object detection, cut/fill elevation comparison, multispectral image processing, plant health analysis, and more. Some software even integrates into CAD programs used by architects and engineers.
There are many options available for photogrammetry. Look at your customer’s initial requirements to determine which software should be used for their application. Below are just a few examples of post-processing software:
Data Products & Final Deliverables
Drone-based photogrammetry surveys can be used for hundreds of applications. The data captured can create insightful and useful products.
Photogrammetry can produce data products including stockpile volumetrics, contour maps, crop/livestock counts, insurance damage claims, environmental change studies, and many more.
Learn more about the basic outputs and software options.
Conclusion
In order to generate successful final photogrammetry products, it is important to begin with the end in mind. Knowing the customer’s requirements and gathering specifications upfront will ensure you come up with a good plan. A well-thought-out plan combined with a tight process will ensure a successful mission and a happy customer.